To remove roof shingles, begin at the roof’s peak, methodically work downwards, and remove shingles in sections. This efficient, safety-conscious approach minimizes damage to the roof structure.
Learn more about the comprehensive steps on how to demo roof shingles in our detailed guide.
Initial Steps Before Removing Shingles
Proper technique in shingle demolition is crucial for both efficiency and safety. It’s essential to start at the peak of the roof, work your way down, and remove shingles in sections. This method helps prevent damage to the roof structure and ensures a more manageable and safer removal process.
Below are the initial steps crucial to demolishing roof shingles:
#1 Evaluating the Condition of Existing Shingles
This step determines whether a complete tear-off is required or if the existing shingles can support a new layer. If the roof has only one layer of shingles laid flat and the decking is in good condition, a tear-off might not be needed.
However, if the roof deck reveals rotted or warped wood or if the existing shingles are uneven and distorted, removing them becomes essential for the integrity of the new roof.
#2 Planning and Coordination of New Roof Installation
Planning involves coordinating with professionals for an accurate assessment of the existing roof’s condition and understanding local building codes, which often limit the number of roof coverings allowed on a building. If re-roofing is considered, the existing roof must be in better than fair condition, without issues like broken shingles or cracked tiles that could lead to leaks.
#3 Preparing the Worksite and Safety Measures
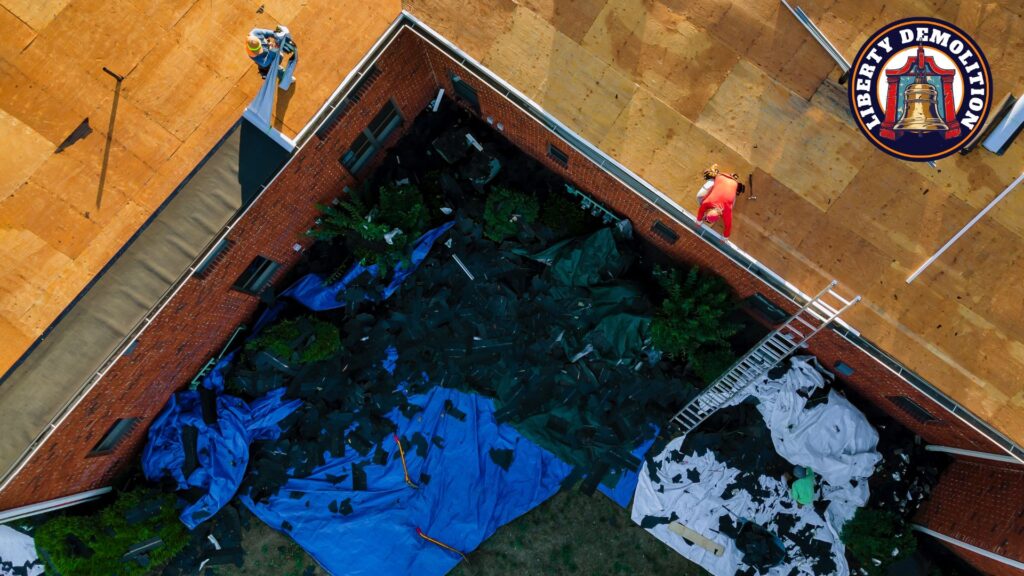
Worksite preparation and safety are paramount in roof demolition. This includes securing the necessary permits, ensuring the availability of a dumpster or large container for debris, and using protective gear like safety harnesses, especially on steep roofs.
Also, clear communication with friends and family about the ongoing work and cordoning off the area with safety tape are advisable to prevent accidents. When removing shingles, starting from the roof peak and working downwards in an organized manner helps in managing the debris effectively and maintaining a clean worksite.
Tools and Materials for Shingle Removal
When it comes to shingle removal, the right tools and materials are essential for efficiency and safety. Here’s a guide to what you’ll need:
Essential Tools for the Job
- Roofing Shovels or Tear-Off Shovels: These specialized tools, designed with steel teeth, are ideal for lifting old shingles off the roof and sweeping them down to a disposal area. Some models have ergonomic handles and rugged construction, which make them durable and comfortable to use for extended periods of time.
- Pry Bars: Useful for removing nails and specific shingles, especially in repair jobs where you don’t need to pull off the entire roof. If you have a roofing hammer, its claw can double as a nail puller.
- Utility Knife: A straight-blade utility knife is a simple yet vital tool for cutting shingles and other non-metal roofing materials like underlayment.
- Tin Snips: Handy for trimming metal flashing to size and cutting rigid roofing materials.
Safety Gear and Protective Equipment
- Personal Protective Equipment (PPE): This includes items like hard hats, cut-resistant gloves, and anti-slip shoes to protect against injury.
- Safety Harness and Fall Protection Kit: Essential for preventing falls and injuries when working on roofs.
Disposal Plan for Old Shingles
- Tarps: Use tarps to protect any exposed sections of the roof from water damage and to collect shingle pieces and stray nails during the tear-off. This simplifies cleanup and protects landscaping.
- Dumpster: A large, heavy-duty garbage or dumpster is necessary to hold the removed roofing materials. For smaller DIY projects, consider a more compact disposal solution like a Bagster.
Step-by-Step Guide to Shingle Removal
Taking off the old shingles requires safety, efficiency, and ensuring a minimal impact on the roof structure. Here are the steps to follow:
Starting Point and Methodology
- Identify Shingle Type: Different shingles, like 3-tab or architectural, have varying removal techniques due to their design and durability.
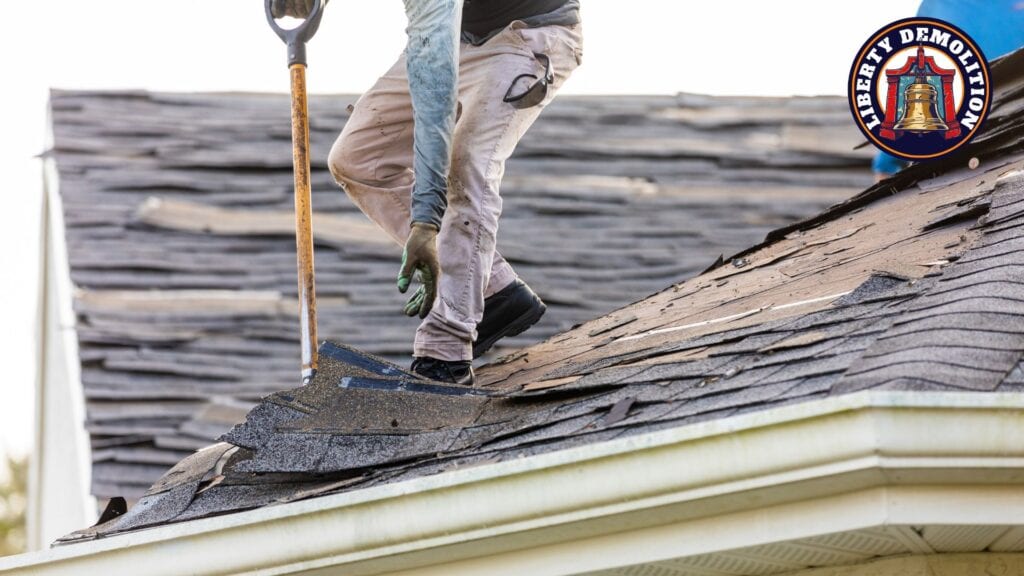
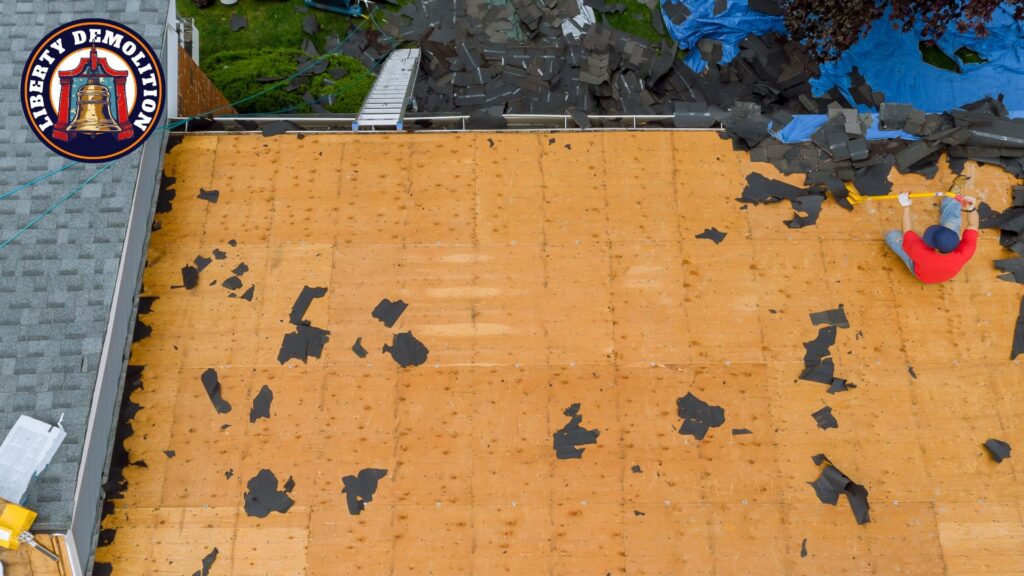
- Begin at the Top: Start the removal process at the peak of your roof. Focus on ridge cap shingles. This approach facilitates the easier removal of underlying layers.
Techniques for Efficient Shingle Removal
- Layer by Layer Approach: Work downwards and remove shingles layer by layer. Use roofing shovels or garden forks to lift shingles and expose nails, which are then removed systematically.
- Handling Nails and Fasteners: Special attention should be given to roofing nails, fasteners, and staples. Utilize tools like a cat’s paw or pry bar for their safe removal without damaging the roof’s sheathing.
- Underlayment Inspection: As you remove shingles, inspect the underlayment for damage. Addressing any issues at this stage is crucial for the roof’s long-term integrity.
Post-Removal Process
After the removal of roof shingles, there are essential steps to ensure your roof is prepped and ready for new shingles. Let’s break down these steps:
Cleaning and Preparing the Roof Surface
- Inspect the Roof Deck: Once the shingles are off, it’s vital to inspect the roof deck for any signs of damage, such as cracks, holes, or water damage. Addressing these issues is crucial for the stability and longevity of your new shingles.
- Debris Removal: Sweep away any loose debris, dirt, leaves, and twigs using a broom or brush. This cleaning is vital to ensure that the new shingles adhere properly to the roof surface.
Installation of Underlayment and Barriers
- Underlayment Inspection: Assess the underlayment for any signs of damage or deterioration. If it’s damaged, replacing it is advisable to ensure the long-term integrity of your roof.
- Barrier Installation: Before laying new shingles, it’s recommended to install ice and water barriers. These provide an extra layer of protection against potential water damage, especially in areas prone to ice dams or heavy rain.
Final Clean-up and Disposal
- Disposal of Old Shingles: Proper disposal of removed shingles is essential. You can consider recycling options or use designated waste disposal centers. Some shingles in good condition can be donated to organizations like Habitat for Humanity.
- Final Roof Clean-Up: After the shingles are completely removed, ensure to remove any remaining nails and sweep the roof deck clean. This step is critical to preparing the roof for the new shingles and ensuring safety.
Frequently Asked Questions
What Are the Signs That Indicate the Need for Roof Shingle Removal?
Here are the signs you must look for to determine if it’s time to remove your roof shingles:
- Missing Shingles: They can lead to water penetration into the attic. It’s possible to replace only the damaged section if the rest of the roof is in good condition.
- Curled Shingles: They can indicate the roof has reached the end of its lifespan, often due to material deterioration or poor attic ventilation.
- Cracked Shingles: They allow water to penetrate, potentially caused by high winds or temperature swings.
- Buckled Shingles: This can be a result of moisture in the roof sheathing and may indicate poor attic ventilation.
- Missing Granules/Dark Spots: Show that the shingles are wearing out.
- Damaged or Missing Flashing: Essential for preventing water leaks; damaged flashing needs repair or replacement.
- Moss, Moisture, or Mold: This indicates issues with the roof not drying out and may require moss removal.
- Age and Wear: Asphalt shingles typically last 14-21 years, while architectural shingles often last longer. Age is a critical factor in determining roof replacement needs.
Can I Remove Roof Shingles Myself, or Should I Hire a Professional?
Shingle removal can be a DIY project if you have the necessary skills and equipment. However, for extensive removal or complex roof issues, consulting a professional roofing contractor is advisable. They can handle the task safely and effectively.
How Do I Dispose of Old Roof Shingles Responsibly?
Proper disposal of shingles is crucial. Some landfills accept roofing materials, but it’s important to check local regulations. Reusable shingles can be donated to organizations like Habitat for Humanity. Only 10% of asphalt shingle waste is recycled, with the rest going to landfills.
The Safe Way Up is Always Down
Remember, aside from getting those old shingles off, successful shingle demolition is about not letting them take you down with them.
At Liberty Demolition, we don’t just tear things down; we build safety, integrity, and excellence. So, if you find yourself looking up at your roof and thinking, “This is a bit more than I bargained for,” remember, we’re just a call away. Our team of experts is ready to step in and ensure your roof shingle demolition is handled safely and effectively, without any drama or unexpected ‘downfalls’.
Need help with a challenging demolition? Reach out to us at Liberty Demolition in Philadelphia. We’re the safety net you didn’t know you needed.